• biography
  • sweets / savory
  • bread
  • natural beauty
  • press
  • blog
Menu

atelier JUJU

  • biography
  • sweets / savory
  • bread
  • natural beauty
  • press
  • blog
Featured
matcha layered cake.jpg
Dec 8, 2022
BAUMKUCHEN INSPIRED / MATCHA LAYERED CAKE
Dec 8, 2022
Dec 8, 2022
six-month aged handcrafted miso paste
Sep 11, 2016
handcrafted miso paste
Sep 11, 2016
Sep 11, 2016
plum_blossom_yeast.jpg
Mar 18, 2015
Spring Celebration
Mar 18, 2015
Mar 18, 2015
Feb 21, 2015
oxygen and yeast
Feb 21, 2015
Feb 21, 2015
Feb 20, 2015
making raisin yeast water
Feb 20, 2015
Feb 20, 2015
Feb 20, 2015
greeting
Feb 20, 2015
Feb 20, 2015


Baumkuchen Inspired Matcha Layered Cake

BAUMKUCHEN INSPIRED / MATCHA LAYERED CAKE

December 08, 2022


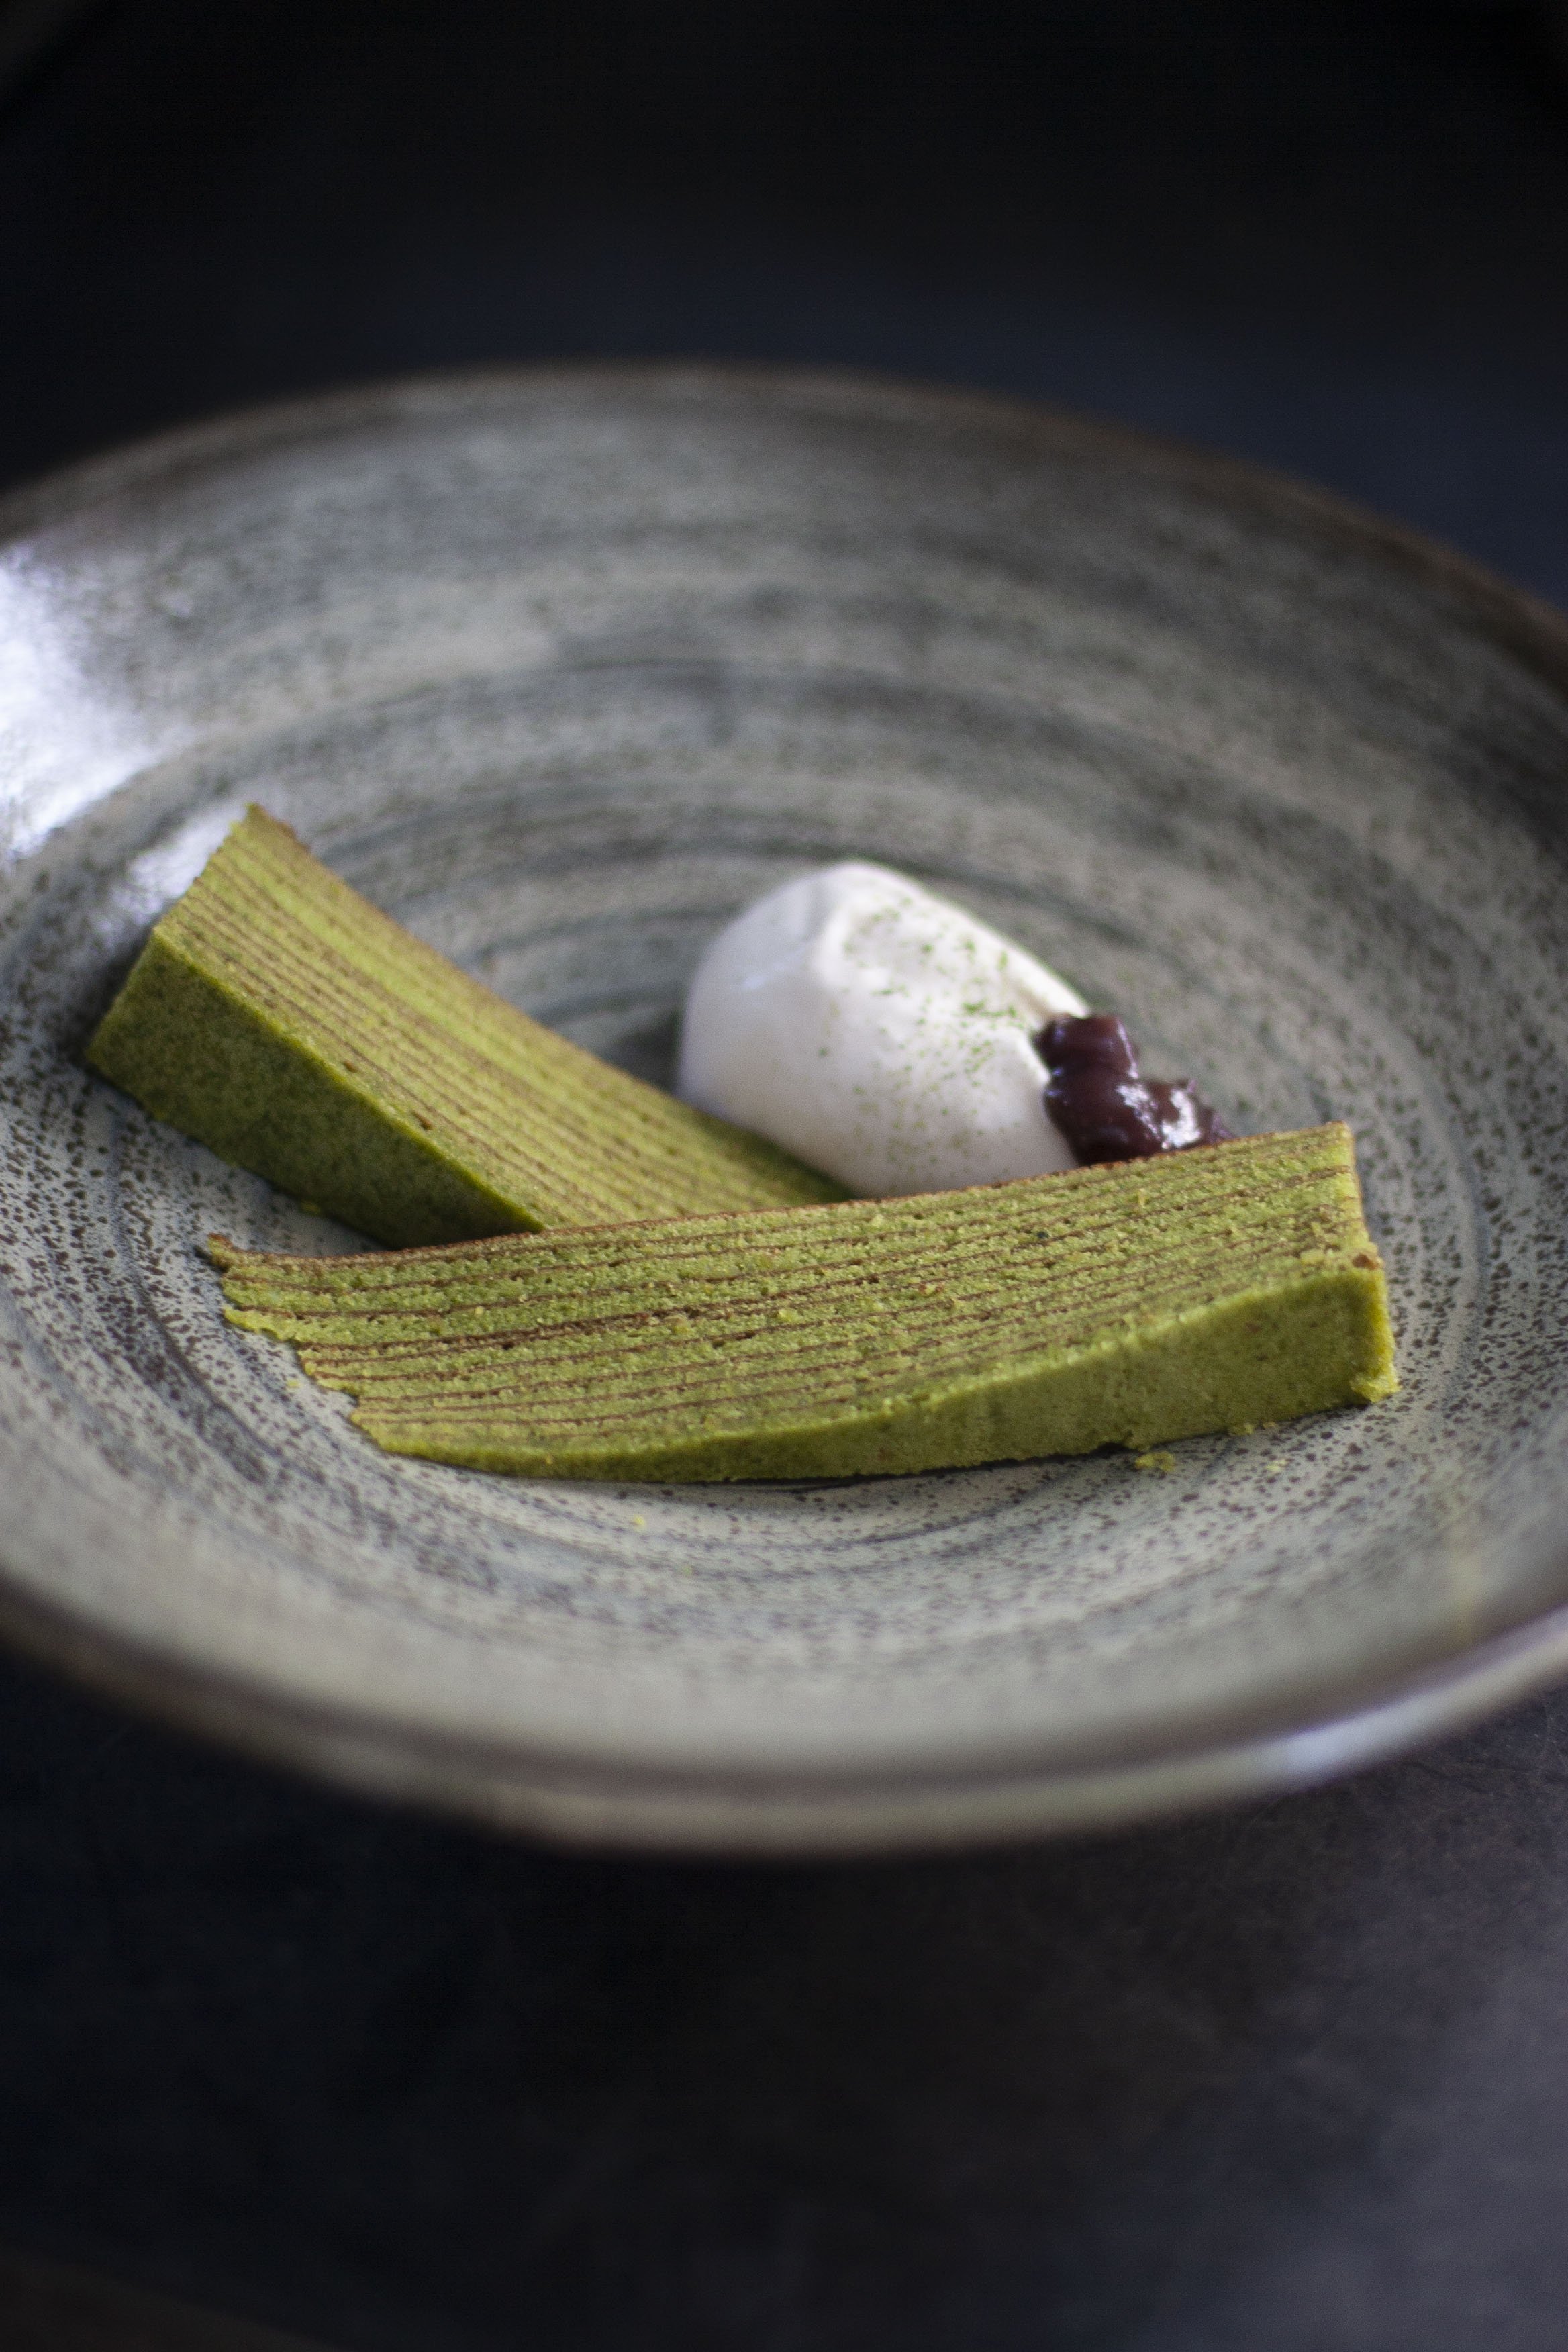
After I posted a buamkuchen-inspired matcha layered cake a while ago on my instagram, I was asked if I sell the cake somewhere.  My recipe is inspired and adapted from Mr. Saigen Daisuke, who came up with his own version of traditional baumkuchen.  According to him, his recipe resembles the Baumkuchen from Patisserie VILLON in Japan.  


Patisserie VILLON is opened in 1965, and is a well-respected patisserie shop in Japan.  Although I’ve never tried its baumkuchen before, this recipe reminds me of the buamkuchen I grew up with in Japan  :)


At first, I tried making it with a Japanese egg pan, a handmade aluminum foil log, and used the stove top to make the cake into a log shape.  With my limited equipment availabilities, using a sheet pan or some form of pan and the broil setting in the oven or toaster oven works better for me.  Since the shape and ingredients are nothing like the original baumkuchen, I would call this recipe as Baumkuchen-Inspired Matcha Layered Cake :)     

I want to special thanks to my dear friend, Christine to go through my recipe :)


BAUMKUCHEN INSPIRED / MATCHA LAYERED CAKE 


YIELD:  1/8 sheet pan (approx. 6 1/2” x 9 1/2” x 1” size)


<INGREDIENTS>


100g unsalted butter, at room temperature

4 large eggs, separated, at room temperature

30g AP flour, sifted 

60g Almond Flour

40g Superfine Rice Flour, sifted

5g Baking Powder

25g Greek Yogurt, Unsweetened, full-fat

1 tsp Honey

2 Tbsp Heavy Cream

2 Tbsp Rum Liquor

1/2 tsp Pure Vanilla Extract

140 g Granulated Sugar

9 g Matcha Powder, fine quality, sifted

Pinch Sea Salt


<PREPARATION>


  • Whisk matcha powder + 3 tbsp sugar (from the ingredients) together and set aside

  • Mix almond flour and 2 Tbsp rice flour (from the ingredients) together in a food processor until the mixture resembles sand. 

  • Sift AP flour and baking powder together


< DIRECTIONS >


  1. Place a silicone mat or spray & place parchment sheet on sheet pan.  Preheat the broiler grill on the oven or toaster oven.


  1. In a mixing bowl, mix the butter until light and fluffy. Add the almond flour and mix gradually until it comes together. Scrape the bowl.


  1. One at the time gradually, add honey, matcha mix, 1/2 of the AP flour, yogurt, vanilla extract, rum liquor, and heavy cream.  Scrape bowls. Add the egg yolks one at a time, followed by 1/3 of the remaining rice flour, beating well after each addition. (Repeat yolk - rice flour additions alternating the yolk and flour.)  Scrape the sides down to make sure the eggs are fully incorporated.  Fold in the remaiing AP flour & baking powder mix until fully incorporated.  


  1. Make a meringue with the egg whites. Put egg whites and pinch of salt in a bowl.  Whisk the egg whites.  Add granulated sugar gradually until shiny, soft peaks form.


  1. Put 1/3 of the meringue into the egg yolk batter.  Slowly add the remaining meringue, fold and mix well. 


  1. Using a ladle, pour a small layer of the batter onto the silicon mat.  Spread the batter evenly with a small offset spatula.  Put the sheet pan inside the oven and bake until the surface turns brown. 


  1. Pour a second thin layer of the batter on top of first layer. Spread the batter evenly.  Put the pan back inside the oven and bake until the surface turns brown.  Repeat the process.  This can make 10-12 layers depending on the pan size.


  1. Once you are done baking, let it cool down till slightly warm.  Unmold the cake.  Immediately wrap the cake with plastic wrap or aluminum foil.   This prevents the cake from drying out.  


NOTE:  


  • Please use high quality matcha if you can.  If the matcha powder is old or not properly stored, it makes different outcome (yellowish color vs. green, less matcha taste)

  • Wrapping the cake while still warm makes a significantly different outcome to the flavor and moisture of the cake. 

six-month aged handcrafted miso paste

handcrafted miso paste

September 11, 2016

(written by Jeremy Loudenback // recipe by Junko Mine)

Miso is just three simple ingredients, soybeans, salt, and koji, one of the reasons that it is a salubrious addition to your diet. For those who are unfamiliar with it, koji, or koji-kin, is rice (or another grain) that has been inoculated with spores from the aspergillus oryzae mold, the same fungus that helps to create sake and soy sauce. In a traditional miso-making process, two different fermentation processes are actually at work. Rice is soaked overnight, drained, and then gently cooked. After it cools down to room temperature, the cooked rice is mixed with a strain of the aspergillus mold and left to ferment in shallow trays for a couple days in a humid room. For many artisanal miso makers, the cultivation and harvest of a specific koji mold is crucial to establishing the unique flavor profile of their misos, and some have guarded their koji strain for generations. (This piece from the archives of the Los Angeles Times gives a fascinating account of the work of a fourth-generation koji master.)

Koji still resembles rice but has a puffed-up, almost jagged appearance, like oblong grains of salt. Once added to the soybeans, the koji is the active element that breaks down the proteins, starches, and fats in soybeans and through the wonders of kitchen alchemy, transforms it into miso. Fortunately for miso makers, koji is available at most Japanese markets. (The one I used came in a plastic container that looks like the ones used to sell yogurt.)

Ingredients

  • 369 grams of dried soy beans

  • 1 tub (567 grams) koji

  • 200 grams of salt

  • Quarter cup or so of sake

Step 1:
Start with the dried soybeans, which should be available in Asian markets, Whole Foods, or Co-op. (I highly recommend using organic, Non-GMO soybeans).  Wash the dried beans several times, until the water runs clear after soaking the beans in a new bath of water (much like rinsing rice). Put the soybeans in a large pot, and fill it up with water several inches above the beans. One recipe calls for adding three times as much water as the weight of the beans, though the important part is to make sure the beans don’t dry out. Soak the beans for 18 hours, checking at a couple of intervals to make sure the beans are absorbing water and expanding, and that the water amply covers the beans.

Step 2:
Once the beans have expanded, drain the beans and add them to a large pot. Add water until the beans are covered by more than an inch. Bring the beans to a boil, lower the temperature, and then cook for four hours. (You can also cook the beans with a pressure cooker, in which case the beans can be cooked in about 20 minutes.) During the cooking process, the beans will emit a protein-rich foam, saponin, which can be skimmed off for another use. Once the beans become soft enough to squeeze between your fingers, they are ready for the next phase. After draining the beans, you can refrigerate them and continue the process the next day, or once the beans have cooled, move on to the next step. (Be sure to let the beans return to room temperature; if the beans are too warm, they may kill the koji.)

Step 3:
Mash the soybeans into a paste using either a grinder or a food processor. The degree of mashing is left up to the discretion of the miso maker; some misos are chunkier than others, though a miso that has larger bits of soybean may take longer to ferment. For this miso, we used a few whirs of the food processor to chop the beans before crushing it into a mostly fine paste with a potato masher.

Step 4:
In a large bowl, mix the salt and koji together. Take particular care to distribute the salt well so that the koji will ferment as evenly as possible.

Step 5:
Add the mashed soybeans to the koji-salt mixture, taking care to mix the two well, kneading and folding it several times to distribute the salt and koji throughout the soybeans.

Step 6:
Once the ingredients are thoroughly combined, form small balls with the mixture. Take special care to squeeze as much air out of the balls as possible: the fewer pockets of air in your miso container, the less opportunity for miso to grow unhealthy mold.

Step 7:
Find a container to ferment the miso. A wide-mouth ceramic jar is preferable. Avoid potentially toxic plastic or metal containers that may affect the taste of the miso. Although miso should be strictly shielded from the sun (to prevent its rays from killing the lactobacillus bacteria), we both decided to use glass jars to better observe the ongoing changes in color during fermentation process. Before adding the miso balls, lightly spray the already sterilized jar with the rice wine or soju. This step adds another layer of disinfectant that will discourage the formation of harmful germs during the fermentation process, especially the ones that might grow in corners. You can also dust the bottom of the jar with salt for the same result.

Step 8:
Add the miso balls to the jar, pushing them hard against the jar. Again, the goal is to remove as much space in the miso paste as possible to prevent the growth of mold. Once all the miso is in the jar, press the mixture down several times with your hands, packing it as tight as you can. Even out the top of the miso, making sure the surface of miso is mostly flat.

Step 9:
Spray a little bit of the alcohol around the sides of the jar and across the surface of the miso (or a light dash of salt for similar effect). The presence of alcohol or salt will discourage the growth of harmful mold on the miso. In addition, I lightly soaked a paper towel and draped it across the top of the young miso paste. The towel functions as a disinfectant and also provides a way to sop up the thin layer of moisture that will occur during fermentation.

Step 10:
Before sealing the jar, place a weight on top of the miso. A suitably heavy stone would work or in this case, I poured salt into a plastic ziplock bag placed on top of the miso. The plastic bag filled the space in between the miso and the top of the jar, packing most of the remaining space (the goal being to provide as little area for mold to grow as possible). Once the jar is stuffed as full as possible, seal the jar with a top and then some thick packing tape if you want to secure it.

After the jar is prepared, stow it away in a dark place and let the fermentation commence. Depending on the season (warmer temperatures will accelerate the process), fermentation can take anywhere from six months to a year, though a longer wait may be rewarded in a more full-flavored and delicious miso. Though research is scarce on the topic, my friend recommends conversations with your miso. Regular bon mots will help develop a strong relationship with your new fermenting roommate, and loving care and attention can only help improve the taste.


Big thanks to my friend, Jeremy Loudenback for writing this article. 

Tags: handcrafted, misopaste, handmade, miso, slowliving
Comment
plum_blossom_yeast.jpg

Spring Celebration

March 18, 2015

One of the things that I really enjoy spring season is looking at full bloom of cherry and plum tree blossom.  Seattle is filled with these beautiful blossom, as well as Japan, which is where I come from.  Around this time of the seasons, we have a traditional custom, called Hanami (or Ohanami).  People in Japan enjoy having picnic under those beautiful trees with group of people (family or friends). 

Not too long ago, my neighbor kindly shared with me their plum tree blossom.  So I picked them, gently washed them, and infused them inside the glass jar with filtered water, plus approximately a teaspoon of local honey.  After about a week later, the infused water was lightly carbonated.  So I baked pain de canpagne (country bread) with this plum blossom kobo (kobo means yeast water in Japan).

The loaves of bread had a hint of plum blossom aroma.  It is definitely not overpowering aroma, like perfume.  The texture was very chewy and crust was pretty crispy :) 

Happy Spring, everyone!

-1 Comments

oxygen and yeast

February 21, 2015

Anaerobic (without oxygen) or Aerobic (with oxygen)

When someone looks at my simple raisin yeast water method, he or she might have stopped at or might have wondered at Step No. 5:  Seal The Jar Very Tightly With The Lid, Leaving No Air.  Then, he or she might have asked oneself  "leaving no air?  Really?"  Yes, yeast can grow in an anaerobic environment.  This was back in December 2014 when I exchanged emails with Debra Wink, a Microbiologist, a Medical Technologist, and also a Baker about it. 

I met Debra when I attended the Grain Gathering Conference during the summer in 2014.  She gave a speech about Natural Leavening: Practice and Principles.  When I shared with Debra my method of making the yeast water, she immediately understood why I make it this way.  In her email, she said, "...there seems to be a belief among bread bakers that yeast can only reproduce in its presence. Clearly that isn't true... So many people think that shaking frequently to aerate is necessary, but it just makes a mess. Also, fermentation doesn't commence to any degree until the oxygen is used up, and fermentation is what we're after..."

I don't have as strong science background as Debra, so I've just learned by making it.  But Debra, kindly shared with me her article on aerobic vs. anaerobic environment issue along with her email.  Thank you Debra for letting me share your article on my blog!!

**************************************************************************************************************************************************
I wish I knew where the myth originated that yeast need an aerobic environment to multiply. Maybe it comes from the beer brewers, or because yeast manufacturers rely on oxygen to produce bakers' yeast. But the oxygen requirement is one of those misunderstood half-truths. What yeast need are sterols and unsaturated fatty acids to build new cells, because these are essential components of cellular membranes. Yeast can manufacture these things in the presence of oxygen, like we humans can manufacture our own vitamin D in skin exposed to sunshine. But like vitamin D, they don't have to manufacture sterols and fatty acids if these are available as nutrients in the growth medium.


Although brewing yeast changes between oxidative and fermentative metabolism according to aerobic or anaerobic conditions, it cannot grow anaerobically indefinitely. As with all eukaryotic cells, yeast cell membranes contain unsaturated fatty acids (UFA) and sterols, which can be synthesized only under aerobic conditions. The amounts of UFA and sterols from malt that are naturally present in wort are too low to support yeast growth, hence the requirement for initial aeration of the wort to allow the yeast to synthesize these compounds.   ~ Food Microbiology Fundamentals and Frontiers, 2nd Edition


It's sometimes said that beer is liquid bread, but that isn't really true. Both are fermented by-products of grain, yes, but beer is made from wort which is essentially a tea --- an extract of sugars and other water soluble stuff with all the grain solids removed. The solids are where the sterols and unsaturated fatty acids are. So, flour is a more complete food for yeast than wort, and can support yeast reproduction.


Now here's the other piece. Yeast metabolize sugars to generate energy in the form of something called ATP (their unit of energy currency). They spend ATP, first, in performing whatever tasks they need to in order to survive and overcome adverse conditions they face in their environment. If conditions are reasonably favorable and they can make more energy than they need for survival, the excess is channeled into growth and reproduction. Without oxygen (fermentative metablolism), yeast can only produce 2 ATP from each molecule of a single sugar; whereas they can produce 38 ATP from the same sugar in the presence of oxygen (oxidative metabolism, or respiration). That's A LOT more energy diverted to reproduction, and it's why oxygen is used in manufacturing yeast. The process would take much longer otherwise. With plenty of oxygen, and everything else optimal, yeast can double in as little as every 75 minutes or so. We certainly don't need or want rates like that in bread dough or we wouldn't be able to control it.


For manufacturing purposes I'm sure oxygen is required for yeast reproduction, but in a circular, catch-22 sort of way. They need oxygen for economic efficiency, because yeast reproduce so much faster with, than without it. They cultivate yeast in a liquid nutrient broth (not a flour-based substrate resembling bread pre-ferments/dough). They don't need to add sterols and UFAs---which would add unnecessary cost to the growth medium---since they are already bubbling large amounts of oxygen through it, enabling yeast to manufacture their own. So, without sterols and UFAs in the mix, oxygen is required.


Michael Gaenzle says it simplest (in relation to sourdough cultures):

Yeasts in dough don't have to rely on oxygen for growth: if that were the case, they wouldn't be there, as oxygen is quickly depleted.   ~ The Bread Builders, pg 231


In addition to the usual chromosomes in the cell nucleus, yeast cells have an additional chromosome (with copies) that resides in, and drives respiration in the mitochondria where aerobic metabolism takes place:


The genome of S. cerevisiae consists of 16 small chromosomes [in its nucleus]... The yeast mitochondrion, which carries out the enzyme reactions in aerobic respiration, has a separate circular chromosome of which 10–40 copies may be present, depending on the physiological state of the cell. ...the mitochondrial chromosome is quite unstable. In about 1–3% of divisions, the daughter inherits a defective chromosome... Such cells are consequently unable to respire, although they continue to live and divide and can carry out fermentation.  ~ Handbook of Dough Fermentations, Chapter 3


When the unstable mitochondrial chromosome becomes defective, it is no longer functional, but the cells and their offspring can still carry on and even reproduce in fermentation mode (anaerobically). It doesn't address the sterol/UFA aspect specifically, but is proof that cells are at least able to generate enough energy to reproduce anaerobically.

~ Debra Wink

**************************************************************************************************************************************************


2 Comments

making raisin yeast water

February 20, 2015

I remember when I was interviewed about my wild yeast project, Martha told me that it might be nice if I can share the method.  I asked Taro if that is okay with him, and he kindly agreed.  I cannot thank Taro enough for letting me share his technique of making the yeast water.  To me, there is no better.  I respect other methods by other bakers; this is simply a different approach in baking.

Although I've been calling "yeast water" for my natural leavening, I am used to calling it, "Kobo" which means yeast or saccharomyces cerevisiae in Japanese.  But in the US, I hear "yeast water" among scientists and bakers.  So here I am, I am calling my natural leavening as yeast water.  (I might call it "Kobo" instead of yeast water in the future, though)  After making various types of yeast water for my naturally leavened bread, I have found apple and raisins are fairly easy to work with.   Making yeast water from fruits is simple. It is a similar concept as alcoholic fermentation.

*******************************************
Making a Yeast Water from Raisin

*******************************************

What You Need:
glass jar with solid lid
organic raisins (without wax coating is preferrable)
filtered water

Method:
1. sterilize the glass jar and the lid with hot water
2. remove dust and gently rinse raisins
3. fill raisins for little less than 1/3 of the jar
4. fill the rest of the jar (2/3) with filtered water until all the way to the top
5. seal the jar very tightly with the lid, leaving no air
6. let the raisins ferment the inside the jar for approximately five days in room temperature

Note:
Depending on the condition (seasons, room temperature, sugar contents of the raisins), fermentation time varies. One way to determine whether the yeast water is ready is when the yeast population (saccharomyces cerevisiae) reaches to its maximum, and you will see the active bubbling inside the jars.  It takes approximately five to six days.  Again, it depends on the circumstances. 

Once it is ready, discard the raisins, and use the remaining juice as leavening agent. Using the yeast water for making starter, levain, or bread instead of plain water in bread recipe helps leavening .  Unlike the sourdough starter, It is best to use up all the starter and yeast water after first or second batch of bread making for a better result.  

Caution:
If you are not going to use the raisin water when it is almost ready, keep the jar inside the fridge to slow the fermentation process.  If you leave the jar for too long at room temperature, carbonation will build up, and the bottles is going to be exploded.

Special thanks to Taro Hashiguchi for sharing the technique of making the yeast water.
 

1 Comment

greeting

February 20, 2015

Hello, there.  Thank you for stopping by my blog.  I've been writing my blog mainly for my family and friends in Japan.  And it was all written in Japanese.  But then, after I was interviewed by Martha Kang, a KPLU Public Radio Online Journalist about my wild yeast project in December 2014 for making bread, I got lots of response from people I never met.  I was really happy to see all the positive feedback I received.  At the same time, I realized that making bread with yeast water is not common in the US, and there is not much information in English.  So, I decided to create my website, as well as this blog to share what I know whenever I can.


I've been making bread with natural leavening or yeast water from fruits, plants, or sometimes edible flower.  Ideally, if it is available, I forage them or pick them from garden.  But most of the time, I get them from local organic stores or farmers' markets.  While I was working in Southern California, I was making pastry, focusing on dessert, such as cookies, mousse, or cake, and not so much on bread.  It was because there were already bakers working in the department, or I was the only pastry chef with no assistant for a private club with approximately 1,000 members, so the company was buying parbaked bread from local bakeries.  Although I loved my life in Southern California, I felt it was time to move back to Seattle.  To me Seattle is a second home town after I lived here many years ago while studying abroad.

Not too long after moving up to Seattle from Los Angeles, I got a job at The Willows Inn on Lummi Island, WA. When I was there, I worked with lots of talented chefs who forage what is available in season.  Every other morning, they come to work with baskets of nettles, wild edible flower, wild fruits, and seaweed.  In addition, local fishermen bring fresh caught wild salmon or the inn's farmers bring freshly picked vegetables they harvest.  It was very inspiring.  Its fridge was filled with produce from its own garden and dairy products from local farms or some local suppliers.  There were no tropical fruits from other continent or produce from different country.  At that time, I was in charge of making breakfast for the guests, the staff meal (breakfast), or taking care of  food for its downstairs cafe, but I could get to see how they work.  That experience definitely made me change the way I eat, and the way I serve: local, sustainable, and seasonal.  Moreover, it encourages me to go out there and find what is available. 

Although I've made bread with raisin water and apple yeast water in California, and have been happy with the results, I was wondering which technique works the best for me, since I have seen slightly different methods by different bakers.  As I was searching for an ideal method for culturing wild yeast, a beautiful photograph of yeast water caught my attention.  It was a vivid red color and a purple color of jar of yeast water.  Taro Hashiguchi, owner of bakery, Taro-ya, makes bread from yeasts that are available in season.  His father grows flowers, fruits, and herbs in his garden for Taro's bakery yeast. I sent an email to Taro Hashiguchi to become his apprentice.  A couple of days later, he replied back to me with a positive response. Since then, I have been making bread with wild yeast from fruits, flowers, and herbs.  It tastes wonderful with less acidity than sourdough (some sourdough bread are not sour) and more flavor than mono-culture/dry yeast.  This is my way of celebrating seasons.  


1 Comment
Back to Top

Copyright ©atelier JUJU. All Rights Reserved